UA-59651954-28 Crafty Allie: May 2015

Wednesday, May 27, 2015

Southwest Chicken Salad


I don't know about you, but I love an eating Southwest Chicken Salads at restaurants.
Well at least those who make it GOOD!

It's quite a simple task you know.
And when you make yourself, you can feed you're whole family for the price of 1 1/2 that you'd buy at a restaurant.

So lets gets started on this super easy recipe!

 You will need:

One pound skinless chicken breast
One large bell pepper
2 stalks of green onions
3 roma tomatoes
1 head of lettuce
1 can of black beans (15 oz)
1 can of yellow corn (15oz)
3 corn tortillas
1 large avocado (optional)
Dressing of your choice

Season your chicken at least one hour before hand.
I like to season mine with fajita seasoning.

Then slice breast into 2 inch wide strips.

In a skillet add a dash of olive oil and begin cooking your chicken on medium.

Use preferably freshly made corn tortillas.

(Mine look like white because they are white corn tortillas)


Cut 2 tortillas into small strips and 
add a dash of salt.

Bake strips at 400 degrees. Bake for 8 minutes or until they start to slightly brown.

Cut your veggies, while your chicken 
continues cooking.

After your chicken is fully cooked, let cool and then cut into bite size, and add to the salad along with the black beans, corn and tortillas strips.

Now all you have to do is decide which dressing to add. 

I love mine with either ranch, or...
my homemade cilantro dressing.


Enjoy!

Thanks so much for tuning in!
Until Next Time...


Tuesday, May 26, 2015

Worthwhile Wednesdays #70


Welcome, Welcome all to the 70th
Worthwhile Wednesdays Link Party!

Thank you so much for partying with me!

Sunday, May 24, 2015

DIY Shoes OFF Sign

Well Hello and Happy Memorial Day!

I hope all of you are enjoying this day in memory of all those who died for our freedom, no matter what country you live in!

I know I certainly am, and I am also so happy to introduce my guest blogger.

Today I have Jess  from 
domicile 37


 I'm Jess, mother of 3 who loves to create, design, sew, and do it all.I love everything that deals with design! I love love love to decorate homes, space planning, and everything design. I do however have a background in design and lets say by any means, I am NOT an EXPERT, oh no...it's just a passion.I am a thrift store-craigslist addict and free cycle queen. I live on a strict budget and try to make the best on that budget. My design style is  ECLECTIC. I do not hone in on a certain style, because I believe there is beauty in all styles. I particularly love vintage decor (all styles included...hollywood regency, Chinoiserie, Art Deco, MCM, etc...) mixed with a bit of modern decor.


As a child, I was taught to always take your shoes off upon entering the house. In my culture it is also a sign of respect and something that I have taught my children to do in our home as well in our friends homes. I remember my mother hanging her "shoes off" sign up on the wall so that visitors knew that that is what we did in her house and it is something that I would love for guest to do in my house, without me having to coax them into it or remind them. 


Before I create any type of signage or word art I like to scribble my vision down on paper...even if it is an envelope. It basically serves as my version of a rough draft.


These are the materials used PLUS black paint, word stencils, a black sharpie marker, a pencil, and a small fine paint brush.

I used a wooden Paris signage that I picked up at a shop and swap months ago as my base for this project, you can also use any type of scrap wood or old art you may have laying around your house.  Feel free to substitute any materials for what you already have at home


1. Prime base, if it has words or pictures on it 

2. Paint the base, I chose to paint my piece Belle Grove Sorbet by Valspar

3. I wrote "Shoes" lightly using a pencil and traced over it with modge podge using a fine tip paint brush then I laid gold leaf over the words shoes and patted it down and let it dry. 
        
     *You can erase the pencil marks using a white eraser.  Mechanical pencil erasers work best. 

4. Remove the access gold leaf with your fingers. I like to reuse my scrap gold leaf so I tear the gold leaf around the words and place it back into the package. 

5. Using a DRY paint brush, brush the extra gold leaf off the piece...be careful gold leaf is very sensitive and brushing to hard can result to you accidentally removing the gold leaf from the lettering or the area you wanted the gold leaf to be displayed. However, if gold leaf is removed from the area you apply it to, you can just reapply it by following step 3 again. 

6. To write the word "OFF" I used some stencils I had on hand and I free handed the rest of the signage using a pencil. If you have a Cricut Cutter feel free to use it on this step or you can use letter stickers for your words...*that is something I almost considered, but I could not find anything large enough or in the style that I liked. 

7. Trace over the words written in pencil with a black sharpie marker.  

8. Fill in the word "OFF"  with black paint and trace over the word "please" with black paint using a fine tip paint brush. 

9. Once the piece is completed you can seal it with modge podge, lacquer, polycrylic, etc...You can leave it as is or like I did you can go over the edge of the piece with a black sharpie marker. 


There you go....the finish product. It is not perfect, but I love how imperfect and raw the word shoes look with gold leaf on it. Very Chic!


If you like this tutorial and you want to see more like this, please visit my blog at Domicile 37

Thanks so much Jess for your wonderful, and classy sign tutorial! So darling!

And thank you all for tuning in!
Until Next Time...

Tuesday, May 19, 2015

Worthwhile Wednesdays #69


Welcome, Welcome all to the 69th
Worthwhile Wednesdays Link Party!

Thank you so much for partying with me!

Monday, May 18, 2015

Copy Cat Boston Market Garlic and Dill New Potatoes

Boston Market Copy Cat potatoes

I don't get the opportunity to eat at Boston Market very often because there's not one near by, but man do I love their new potatoes.

I am not quite sure how they make theirs, but these taste even better than theirs!

To start out you will need a 3 pound bag of red potatoes.

I usually use 3/4 of the bag for the 4 of us, and that usually gives us 2 small baggies of left overs.
So if its just for you and your family, 1/2 bag will be enough, unless you're like me and you want leftovers. Because lets face it, sometimes leftovers are even better cooked the second time around after they've gotten to marinate, YUM!

Thoroughly wash the potatoes, and pick out bruising and aging. Use a butter knife or very dull knife to do so.
Boston Market dill garlic potatoes prep

In a large pot, fill about 3/4 water in the pot and boil.
While you're waiting for the water boil, cut the potatoes. Cut them in half and then half again.
On the bigger potatoes, more cutting will be necessary to make them bite size.

cut potatoes into wedges

Place the potatoes very carefully, as not to burn yourself, and let them boil for about 15 minutes.
boil potatoes for 15 minutes on high or until soft
If you're not quite sure if they are done, stick a fork into one too see if its soft.

When you're sure its ready, drain the potatoes and let them cool off for at least 10 minutes.
let new potatoes cool 10 minutes before adding spices

Add
1/4 cups of Olive Oil

ingredients for new potatoes recipe


Add 3-4 tablespoons of Lawry's garlic salt with parsley. 
Boston Market New Potatoes recipe


And lastly add 3 tablespoons of dill weed.

how to make Boston Market garlic dill new potatoes

And stir it all together!


It's that simple!!!

Bake some chicken, and make some fresh garlic green beans, and 
pretend to be eating Boston Market, but it will taste so much better because it was made by YOUR hands!

Thanks so much for tuning in!
Until Next Time...

Sunday, May 17, 2015

DIY Mini Crate Makeover

Hello Monday Moaners!

Hope you all had a wonderful weekend!

Today, I am honored to have Sue from 


Sue is a DIY, paper crafting, picture taking, creative kind of gal. She's also a bit of an organizing nut! Sue loves to find good JUNK to re-purpose into GREAT treasures!
You can check out Sue's blog at

My DIY Mini Crate Make Over…
Because sometimes a girl changes her mind.
It all started with this… 
 My Sweet Earth Day Tea Party Crate.
A cute cream and pink crate with a pretty pink flower.
It was perfect for what I wanted at the time.
But… always resourceful, I decided to reuse the mini crate in my work space.
Because my work space has a vintage vibe… a mini make over was in order.

I took off the flower embellishment and gave the crate a light sanding.
Being an impatient crafter, I was tempted to start my next color right away.  
Make sure to wait.
Allow a couple of hours for the piece to dry before adding the next color.  (trust me).
Next, I gave the crate a light coating with Black Home Décor paint.
Use a small paint brush to get into those corners.
With a soft, damp, clean cloth, wipe off the black paint to give it an aged distressed look.


If you start to think it looks to dark, just add highlights with the red paint directly over the ebony paint.
If you like a mat finish, you can stop right here.
I wanted a little more sheen, so I applied FOLKART Plaid 34170 Home Decor Wax, 8-Ounce, Clear.
With the wax, you apply a thin coat, wait one hour and buff with a clean soft cloth.
I’ve always loved furniture with that aged red finish and wanted to give it a try.
Now that I’ve started with something small, (which is always a good idea)
I’ve got my eye on a couple more pieces I’d like to refinish.

FYI:  If you’d like a mini crate like mine you can get it at Walnut Hollow.


Thank you so much Sue, for guest blogging and showing off your fabulous crate makeover!

And thank you all for tuning in today!
Until Next Time...

Thursday, May 14, 2015

Double-Sided Fabric Headbands

how to make fabric headbands


Well, Hello there and TGIF! 

I've had a few things on my crafting wish/to do list, and this was at the top of it!
My daughter, while she can be very prissy, can also be a bit of a TOM BOY.
She is pretty much fine with just a pony tail every single day.

She will occasionally let me put a flower or bow in her hair if it matches her outfit, but she quickly takes it out because she said its hurting her head.

But when I purchased a similar headband recently, she wore it all day long.

And I was like 
"Yes, finally, I've gotta make this 
girl some headbands!"

These are super easy to make.

The best part about making these headbands is you can use fabric fat quarters, and of course...
your left over fabric scraps.

fat Quarters fabric headbands

First off let me just tell you how addicted I am to Fat Quarters.
At Joann's you can buy them for $1, so you can buy a lot. I tend to spend at least $10 in fat quarters every time, I go.
I mean just look at the pretty patterns, eek!


You'll also need some kind of elastic.
I use the fold over (baby headband elastic)


For kids headbands I cut about 5 inches.

I've made a template, and all you have to do is right click to save the image and print it.
Actually you can just print it right from here.

If you are a Windows PC user then when you print, select full page so its the correct size.

free printable fabric headband pattern

It's best to print this on card stock so you can easily trace it onto your fabric.
I usually fold mine inside out, so the marks are on the right side. 

Fold your fabric, and place the wider end where the arrow is on the fold, trace it and cut it out,
you'll need two of these.

free fabric headband pattern


To make it reversible cut the second one out in a different pattern.

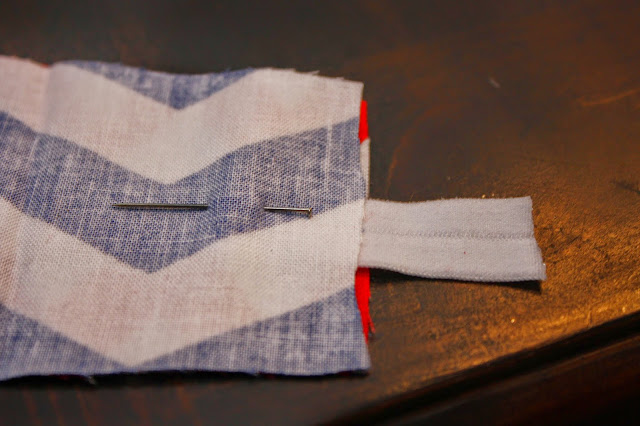
Place the right sides together and pin your elastic on one side pointing long side downwards.
I leave about 3/4 inch of the elastic hanging out.
how to sew a chevron fabric headband

pin elastic to fabric headband

Using your sewing machine footer as your guide place the footer on the inside of the footer,
 and sew the sides of your headband.

sewing a fabric headband


Now, again place the footer on the inside right edge footer and sew from each stitch on the sides to each stitch across the top where the elastic meets.


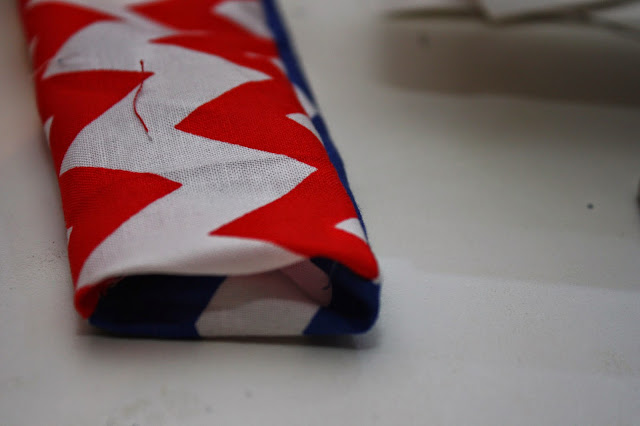
Turn it inside out, 
turning fabric headband inside out

and tuck in the ends into the headband.

fold in ends of fabric headband

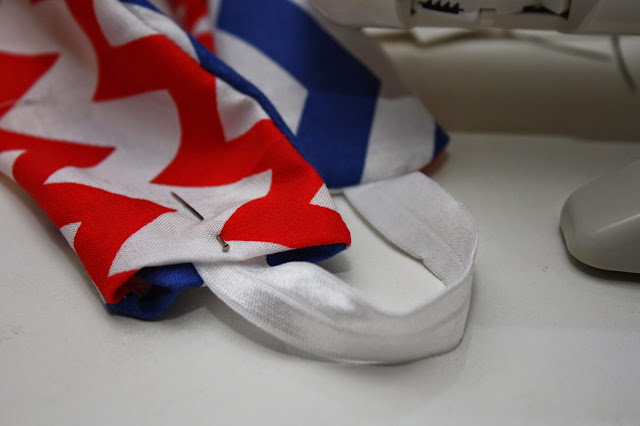
Place the other side of the elastic (make sure not to twist) and pin together to make sure it stays secure.

inserting elastic for fabric headband

This time I tend sew to as close as the edge of the fabric as possible and I sew it back and forth about 4-5 times to make sure its nice and secure.

Then snip off all your unwanted strings, 
iron it to keep the seems in place,
and you're done! 

chevron fabric headband

If you notice closely in the other photos I have stitching on the ends, this was because I was doing it the hard and WRONG way. But you can stitch on both sides all the way up and down if you want a stitched look.


My daughter loves that she can go and choose either side.


I made one for her friend, and she's been wearing it daily. Hmm, may need to make her more too!
girls posing in fabric headbands peace signThanks so much for tuning in!
Until Next Time...


Related Posts Plugin for WordPress, Blogger...