Well Hello, my beautiful friends!
Today I am so honored to have
Dinah Wulf on as a guest blogger. She wrote this fabulous post and was featured on Fix.com, and they've asked me to share it with you lovelies.
Take it away Dinah!
Pumpkins Galore
A Quick Guide to Carving and Decorating Jack O’ Lanterns
The signs of fall are gradually taking over: changing leaves, chilly temperatures, football flags proudly waving on your neighbors’ front porches or at a tailgate party. Every coffee shop and bakery has the distinct aromas of pumpkin-flavored coffees and pastries. Pumpkin patches pop up in every city, and Jack O’ Lanterns start popping up in store windows and lining the front steps of every home. Pumpkins are everywhere this time of year. We carve them, eat them, and wear them as costumes. We line our mantels with them, turn them into table centerpieces, and bake cookies, cakes, and pies with them. For many, pumpkins symbolize family and tradition during this time of year.
History of Jack O’ Lanterns
But why do we go crazy over this iconic fruit, and where does the pumpkin-carving tradition come from? Jack O’Lanterns were originally carved out of turnips and potatoes. While Jack O’Lanterns’ location of origin is uncertain, pumpkins are native to North America, and carving and lighting them gained popularity after Irish and Scottish immigrants arrived in the United States in the mid-1800s. Pumpkins are harvested in October, just in time for Halloween and Thanksgiving. It was once a common belief that carving scary and grotesque faces in pumpkins and placing them in front of your home would ward off evil spirits (or pranksters) on Halloween.
Several different folklore urban legends are associated with the Jack O’Lanterns. One common legend with many different versions is that of Stingy Jack. Stingy Jack was a manipulative drunk who tricked the devil more than once with his devious ways. When Stingy Jack died and arrived in heaven at the Gate of Saint Peter, God would not allow him to pass, and he was forced to roam the earth, never to find a resting place, with only a small light inside a turnip to light his way for all eternity.
Over the years, pumpkin carving has become more popular. By the 1920s, pumpkins were widely embraced in the United States as part of Halloween and Thanksgiving traditions. Since then, it has turned into a multimillion dollar industry with pumpkin patches, Halloween decorations and costumes, and carving tools featuring on millions of shopping lists.
Basic Carving Tips and Tricks
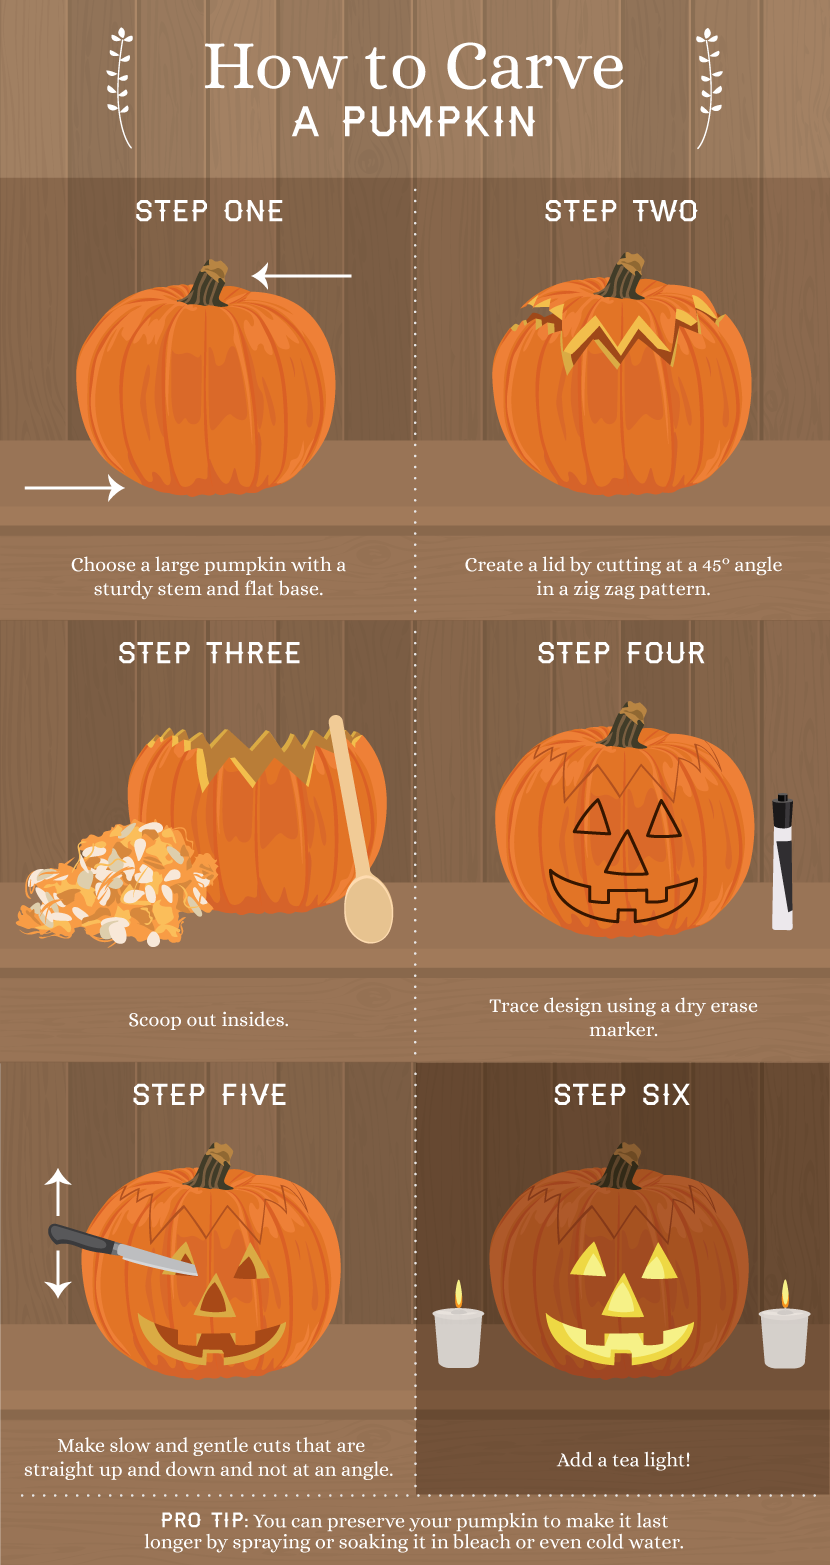
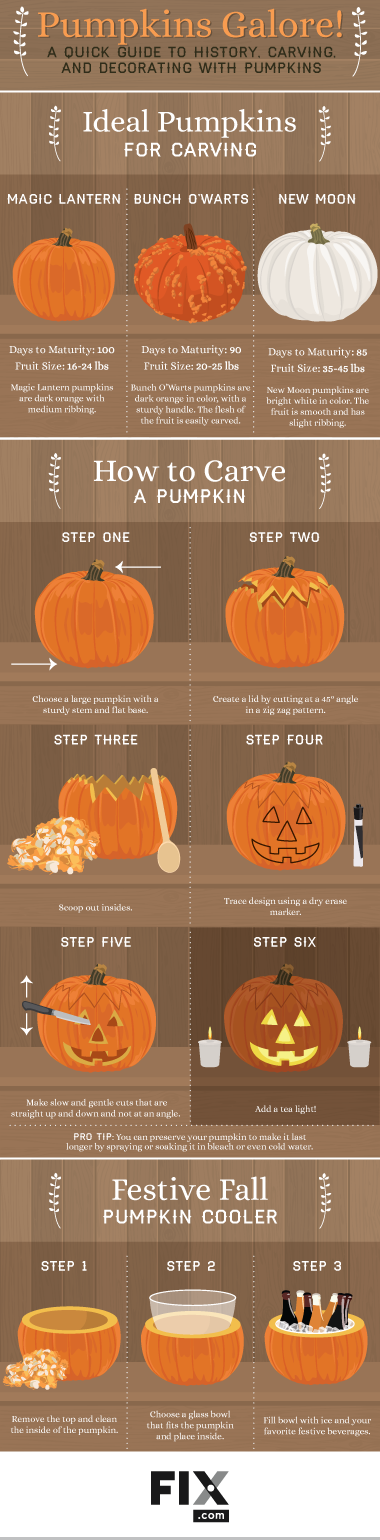
Choose the right pumpkin. A large pumpkin with a sturdy stem and a flat base is ideal. Large pumpkins are easier to handle and carve, and a sturdy stem is a sign of a healthy pumpkin that will last longer. Be sure to examine your pumpkin from top to bottom, and avoid ones with soft spots and bruises.
Use the right tools. These days, many great tools for both kids and adults are available in retail stores. A boning knife or serrated knife works well for carving, an ice cream scoop works well for removing the pumpkin seeds, and a scraper cleans the inside walls nicely. For kids, you may want to purchase a carving tool set especially designed for them.
Cut the lid. First, create a lid by cutting at a 45-degree angle so it does not fall into the pumpkin when you place it back on top. I like to cut the lid in a zig zag shape. Another option is to cut off the back or bottom. The choice is based on what you want and the look you want to achieve for your pumpkin.
Scoop the goop. Remove all the seeds and pulp with an ice cream scooper. Place them aside and roast them later for a healthy snack! Once the seeds are removed, scrape the walls with a scraper. If you carve a pattern in the front, try to scrape the back of the pumpkin as smoothly as possible because it will be visible through your carved design and will reflect the light.
Draw and carve. Draw the face or trace a template for your desired design. Your design can be scary, grotesque, or funny. Consider using a dry erase marker so you can easily wipe off mistakes. If you are a beginner, start with a simple design. Use a small paring knife or Exacto knife for more detailed designs. Make slow, gentle cuts that go straight up and down, not at an angle. More experienced carvers may use drills and electric carving knifes.
Preserve it. You can preserve your pumpkin to make it last longer by spraying or soaking it in bleach or cold water. After you soak it, make sure to dry it completely to avoid mold. As an added preservative, apply petroleum jelly to the cuts. When you are finished carving, sprinkle a little cinnamon on the bottom of the lid or base of the pumpkin to make it smell like pumpkin pie!
Other Pumpkin DIY Ideas
You don’t have to carve a pumpkin to decorate it. There are also many beautiful but spooky alternatives to carving a pumpkin for your Halloween decor. You can paint them, decoupage them, or cover them in fabric or tulle. You can embellish them with flowers, gems, or gauze. You can even repurpose them and turn them into fall-inspired serving bowls, drink coolers, or flower vases.
To
decoupage fabric onto a pumpkin, cut strips of fabric one or two inches wide. To determine length needed, measure from the stem to the bottom center of the pumpkin. Apply decoupage medium directly onto the pumpkin with a paintbrush. Place one fabric strip, and apply another generous layer of decoupage medium on top of the strip. Continue applying strips until your pumpkin is covered. Allow it to dry completely.
To make a drink cooler, choose a large, wide pumpkin. Follow the tips and tricks above for cutting the lid, removing the seeds and pulp, and scraping the wall. Do not carve it. Place a glass bowl inside the pumpkin. Fill the bowl with ice and place a bottled beverage inside. Consider embellishing the pumpkin by painting it or attaching paper bats to the outside. This pumpkin drink cooler is perfect for Halloween parties and get-togethers.
The pumpkin is officially an icon of autumn. From Halloween through Thanksgiving we can’t get enough of them. So now that you know why we carve pumpkins and how to carve one, it’s time to make it a family tradition. Join front porches all across America, carve them, line them up, and light those Jack O’Lanterns!

Dinah is a DIY expert. She runs a successful
home décor, crafting, and DIY blog that has been recognized by Parenting.com, Circle of Moms, and Mashable. She holds a Masters of Arts in Speech Communications from California State University Fullerton.
Want to find out more about Fix.com?
Get to know their awesome authors and what they do when they’re not writing for Fix.com.
Thank you so much Dinah and Fix.com for such a fantastic tutorial! I am definitely going to use some of these ideas next week!
And Thank You All for tuning in today!
Until Next Time...


.jpg)