


Well Hello all!
Happy Moanday, I mean Monday!
I am one happy Mama! It's Summer time!
I get to sleep in most of the time for the next 2 1/2 months, yahoo!
Ok, enough excitement. I am spending time with out of town family this week,
so Denise from

Has been so kind as to guest blog for me today!
You may have already seen this fabulous dresser makeover,
but if not you're in for an incredible treat!
Take it away Denise!
 Denise Designed is all about Home Design Inspiration and DIY Tutorials along with many things Lifestyle and Business related. My Home Design Inspiration and DIY Tutorials along with many things Lifestyle and Business related.!!! goal is to Inspire while being Inspired myself! Peruse my site, pin your favorite posts and check back regularly for new Inspiration. I hope you find a little something to help to Design...Home, Career and You.
I had a vision and couldn’t find what I wanted so I knew I had to make it!
Lo and Behold…my neighbor was throwing one away that she had bought from IKEA and so of course I snapped it up.

While it didn’t take me long to do, it sure was a lot of work.
I first had to take off the hardware.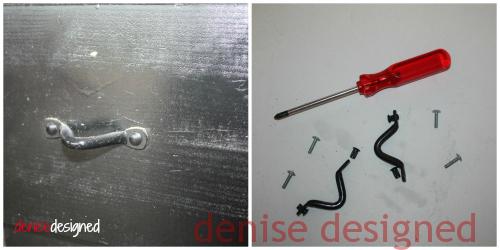
Because my new hardware required only 1 hole, I had to fill the other hole with wood filler (with my fabulous helper… My Daughter Emma). Four drawers so 8 holes total. Whew!

Then I had to sand the dresser, which included sanding the holes with the wood filler.

I KNOW…I KNOW…there are a lot of tutorials that show you how to paint a piece of furniture without sanding it, but this one was a mess. I wasn’t trying to sand off the color, but trying to get a flat surface. When you ran your hand over it, was like sandpaper. But afterwards…smooth as a baby’s bottom.
Once that was done, I started with a shade of cream and painted the whole piece, body and drawers.

Working with the drawers specifically…
I finally had a chance to use the Wave FROGTAPE that I received from the Haven Conference as swag! Yay!!

I taped out the design on each of the drawers and then painted with the fuchsia color.

Now it was time to work on the body of the dresser. I reached for the Blue Tape and OH NO!!! The Blue Tape had a mud dauber nest.

GROSS!!
Of course I searched for something else right away and found masking tape. I thought that the masking tape would work. Boy was I wrong. I had to go back and do a lot of touch up. But regardless…I used the masking tape to tape the design on the top and then painted away!

When I taped off the sides, I did use the Blue Tape. I put my big girl panties on and cleaned off the mud dauber nest! Again…GROSS! And then I painted inside the tape as well.

Once it was all dried and tape removed, I did have to flip it on its top and paint the legs.

That was definitely hard to do right side up. However, waiting for the legs to dry gave me the time to do some touch-up. I won’t show you a picture of the effort there because I am a perfectionist and you would then see the imperfection too closely. What I did learn, the more I tried to make it perfect, the more “not so perfect” it became.
I finally had to make myself just STOP and admire it for the piece that it was.

Finished product!

While I DIY or pay someone else to DIY many things, furniture is usually not one of those items. This was my first project and I think it was definitely a success.
I've always, loved this piece, and I want it so bad for my daughter's room. Guess I'll have to make it myself!!!
Thank you So much Denise for Guest Blogging today!
And thank you all for tuning in today!
Until Next Time...

They use advanced tools to analyze audience behavior, monitor trends, and develop strategies that deliver measurable results. By combining SEO, affordable marketing services for startups content marketing, social media management, and paid advertising.
ReplyDeleteThe quality of fabric paired with precise tailoring ensures durability and a polished appearance. Customization options, jubbah such as embroidery and unique patterns, allow individuals to showcase personal taste while maintaining elegance.
ReplyDeleteA roof handled by professionals not only enhances durability and energy efficiency but also contributes to the overall aesthetics and value of the property. What type of roof shingles are best engaging experts ensures peace of mind and confidence in the roof’s lasting performance.
ReplyDeleteWith proactive monitoring and attention to detail, the property remains secure, safe, and well-maintained at all times. Expert management property management companies ensures that every aspect of property safety is monitored and maintained systematically.
ReplyDeleteWhile adopting more mindful habits that contribute to long-term wellness. Weight-support injections and medications can provide a balanced approach how to remove popcorn ceiling in double wide mobile home for people who want guidance and additional help in reducing body fat and improving how they feel.
ReplyDelete